Yugmir™ Free trial
Step-by-step guide · Revit

The Yugmir™ Manage tab, step by step

Every button Yugmir Software adds to Revit: what it is for, how to run it, and what each choice does. The same guide is a PDF to keep or to share with your team.

Before you begin Install, activate and connect to your firm's tools

Getting started

Everyone

Install once, and the Yugmir Manage tab appears in Revit. Five short steps take you from a fresh install to your firm's tools on the ribbon.

  1. Start Revit. The Yugmir Manage tab appears on the ribbon.
  2. Activate: paste your licence key and press Activate License. No key yet? Get Trial / Buy License opens yugmir.com, where a 15-day trial key is free.
  3. Choose whether usage may be recorded. You are asked once; closing the window counts as no.
  4. Open Global Settings and enter your firm's shared tool library (often your IT team has set this already).
  5. Press Sync Tools. Your firm's tools arrive on the ribbon.

Good to know: No shared library yet? Yugmir's own tools work without one. The first person to point Yugmir at an empty library is offered to set it up and becomes its administrator.

The Yugmir Manage tab on the Revit ribbon

Everyday On every user's ribbon

Sync Tools

Everyone

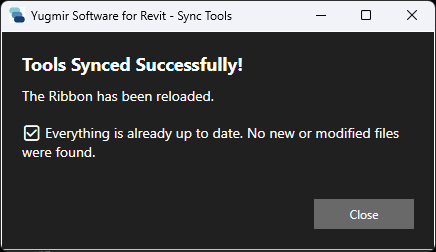
Brings your ribbon up to date with your firm's shared tool library – new tools, updated tools and retired ones – without reinstalling anything.

  1. Click Sync Tools on the Yugmir Manage tab.
  2. Yugmir checks the shared library for the tabs you subscribe to in the Tool Store.
  3. New and changed tools are downloaded; retired tools are moved to a backup, never deleted.
  4. The ribbon reloads and a summary shows what changed.

Good to know: Sync also runs every time Revit starts. A file Revit is using finishes updating at the next start, and the summary says so.

The Sync Tools window in Yugmir Software for Revit

Reload UI

Everyone

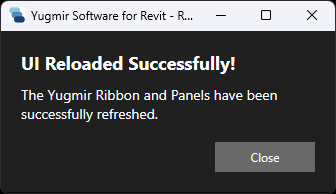
Rebuilds the Yugmir ribbon in a second, without restarting Revit.

  1. Click Reload UI.
  2. Every Yugmir tab and panel is rebuilt from the tools on this computer.
  3. Your open models are not touched.

Good to know: Use it after building a tool of your own, so its new button appears. Sync Tools already reloads the ribbon for you.

The Reload UI window in Yugmir Software for Revit

Search Tools

Everyone

Find any tool by name and run it – no hunting through tabs. Pin the ones you use most and give them keyboard shortcuts.

  1. Click Search Tools.
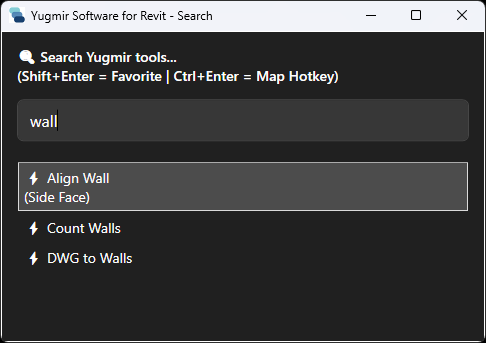
  2. Type part of a tool's name. Matching tools are listed as you type.
  3. Press Enter (or click) to run the highlighted tool.
  4. Shift+Enter pins it to your own ★ My Tools tab, or unpins it.
  5. Ctrl+Enter gives it a two-letter keyboard shortcut of its own.

Good to know: Press Esc to close the search window without running anything.

The Search Tools window in Yugmir Software for Revit

Tool Store

Everyone

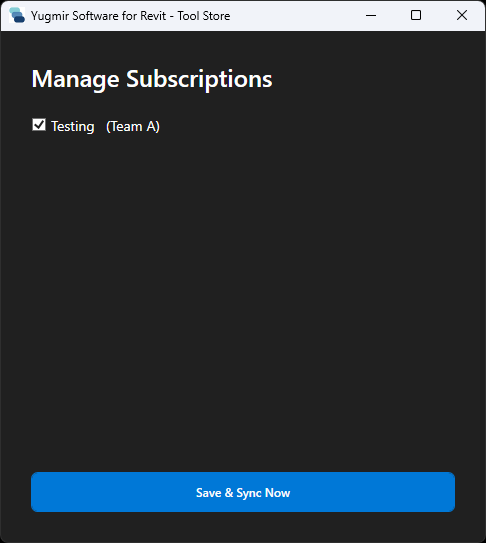
Choose which tool tabs appear on your ribbon. Only the tabs you tick are downloaded, so every user sees just what their work needs.

  1. Click Tool Store.
  2. Tick the tabs you want; untick the ones you don't.
  3. Other teams' released tabs are listed too – tick one to add it.
  4. Press Save & Sync Now. Your ribbon updates straight away.

Good to know: Unticking a tab only hides it on your ribbon. Nothing is removed for anyone else.

The Tool Store window in Yugmir Software for Revit

Batch Runner

Everyone

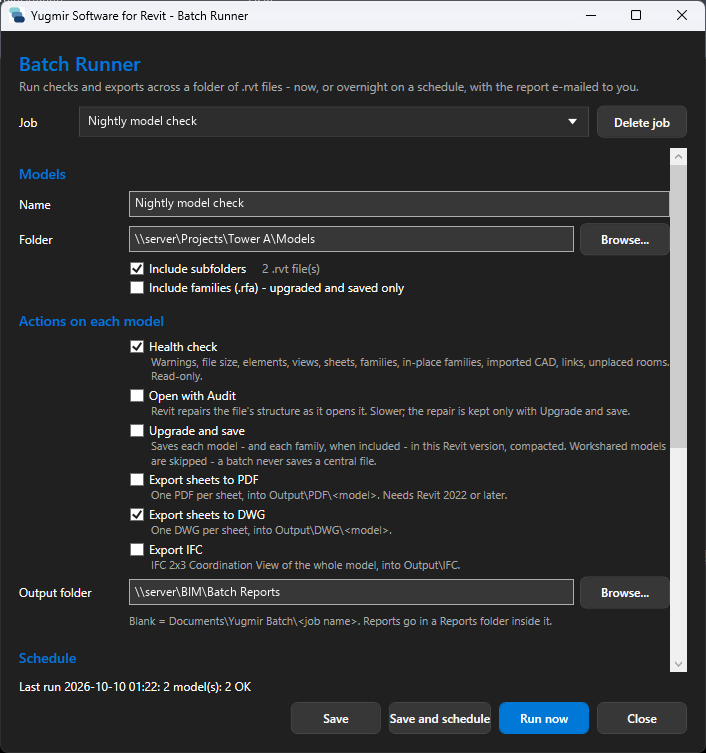
Runs checks and exports across a whole folder of models – now, or overnight – without opening each one yourself.

  1. Click Batch Runner and choose a job, or New job, and give it a name.
  2. Pick the folder of models. Tick Include subfolders to take in every project below it, and Include families to upgrade the family library (.rfa) in it to this Revit version too.
  3. Tick what to do with each model: health check, audit, upgrade, export sheets to PDF or DWG, IFC.
  4. Choose an output folder, or leave it blank for Documents\Yugmir Batch.
  5. Press Run now. A progress bar shows each model; Open report shows the result.

Good to know: Workshared models are opened detached, so a batch never locks or changes a central file.

The Batch Runner window in Yugmir Software for Revit

Batch Runner – overnight and by e-mail

Everyone

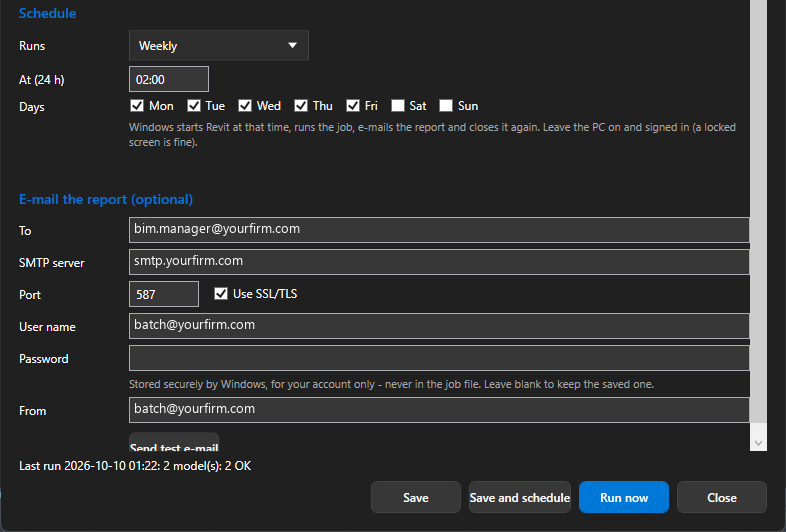
Let the job run while nobody is working, and have the report e-mailed to you in the morning.

  1. Under Schedule, choose Once, Daily or Weekly (tick the days), and a time.
  2. Under E-mail the report, enter who receives it and your mail server's outgoing (SMTP) settings.
  3. Press Send test e-mail to check the settings before the first night.
  4. Press Save and schedule. At the set time Windows starts Revit, runs the job, e-mails the report and closes Revit again.

Runs

  • Not scheduled – run it yourself with Run now
  • Once – on a date and time you pick
  • Daily – every day at the same time
  • Weekly – on the days you tick

Good to know: Leave the PC on and signed in – a locked screen is fine. Use your provider's outgoing server and port 587; the e-mail password is stored securely by Windows, never in the job.

The Batch Runner window in Yugmir Software for Revit

Global Settings

Everyone

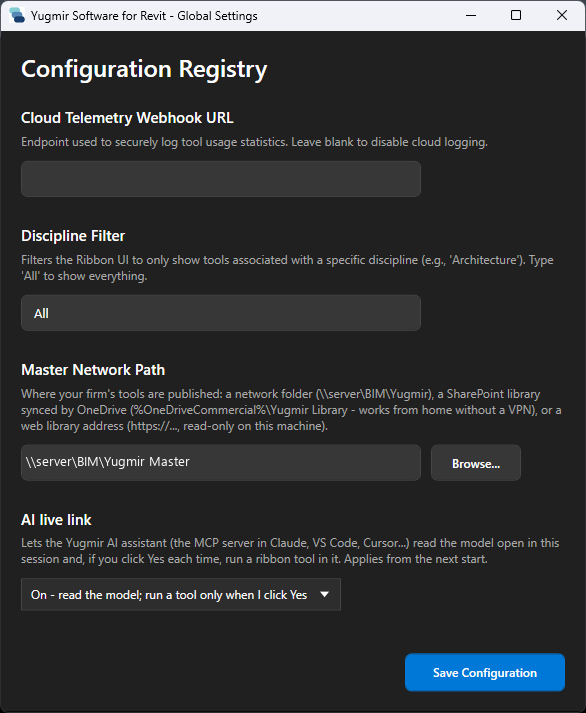
Your own Yugmir settings – above all, where your firm's shared tool library is.

  1. Click Global Settings.
  2. Master Network Path: your firm's shared tool library – a network folder, a SharePoint library synced by OneDrive, or a read-only web library.
  3. Discipline Filter: show only tools for your discipline, or All.
  4. AI live link: whether your AI assistant may read the open model and run a tool when you say yes.
  5. Press Save Configuration, then Sync Tools.

AI live link

  • On – read the model; run a tool only when I click Yes
  • Read-only – read the model, never run anything
  • Off – no connection at all

Good to know: IT can set the shared library for the whole firm when Yugmir is installed, so most users never need to open this.

The Global Settings window in Yugmir Software for Revit

Build your own tools For the people who write your firm's tools

New Tool Project

Everyone

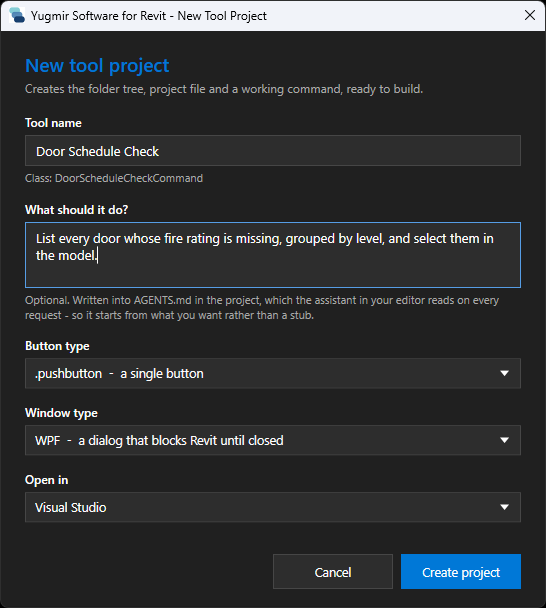
Starts a new tool for you: a ready-to-build project with a working command, opened in your code editor.
  1. Click New Tool Project.
  2. Type the tool's name and, if you like, what it should do – your AI assistant reads it.
  3. Choose the button type and the window type.
  4. Choose the editor to open it in, and press Create project.
  5. Build it. Press Reload UI and the new button is on your DEV tab, for you only.

Good to know: A tool on your DEV tab is yours alone until you publish it with Publish Tool.

The New Tool Project window in Yugmir Software for Revit

New Tool Project – the choices

Everyone

Every choice in the New Tool Project window, and what each one gives you.

Button type

  • .pushbutton – a single button
  • .togglebutton – a button that stays pressed, on and off
  • .smartbutton – a button that sets itself up at startup
  • .combobox – a dropdown list on the ribbon
  • .urlbutton – opens a link, file or folder – no code
  • .pulldown – a menu of buttons
  • .splitbutton – a default button with a menu
  • .stack – up to three small buttons stacked

Window type

  • WPF – a dialog that blocks Revit until closed
  • WPF Modeless – a window Revit stays usable behind
  • Dockable / Service – boots with Revit, no ribbon button
  • None – a command that runs and shows no window

Open in

  • Visual Studio
  • Visual Studio Code
  • Antigravity IDE
  • Cursor
  • Just open the folder – no editor

Good to know: A .urlbutton asks for the link, file or folder to open instead of code. A service or dockable window needs Revit restarted rather than Reload UI.

Import Tools

Everyone

Brings the tools you already have onto the Yugmir ribbon – with their buttons, icons and tooltips.

  1. Click Import Tools.
  2. Choose a pyRevit extension, a single tab, or a folder of Dynamo graphs.
  3. Yugmir lays them out on your DEV tab: every panel and button, with its title, tooltip and icon.
  4. A report lists what works straight away and what still needs converting.

Good to know: Nothing reaches anyone else until you publish. Code written outside your firm keeps its own licence – the report reminds you.

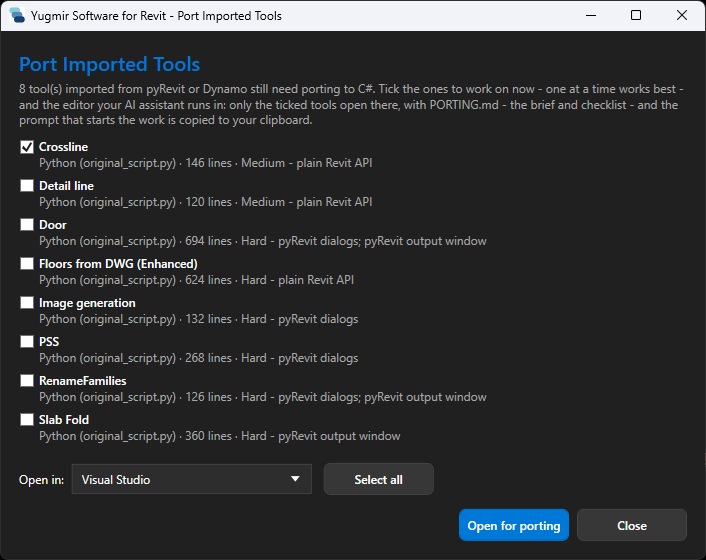
Port Imported Tools

Everyone

Hands the imported tools that still need converting to your code editor and AI assistant, easiest first.

  1. Click Port Imported Tools. Each tool is listed with how hard it is to convert, and why.
  2. Tick the ones to work on, or Select all.
  3. Choose your editor and press Open for porting.
  4. The editor opens with a brief and a checklist, and the prompt is copied to your clipboard.
  5. Paste it into your AI assistant (Copilot, Cursor, Claude...). It converts, builds and ticks off each tool.

Open in

  • Visual Studio
  • Visual Studio Code
  • Antigravity IDE
  • Cursor
  • Just open the folder – no editor

An editor that is not installed is offered as Download, with a link to get it.

Good to know: A tool leaves this list as soon as it has been converted.

The Port Imported Tools window in Yugmir Software for Revit

Administration Shown only to the people who release tools

How a tool reaches your firm

Every tool goes DEV, then Beta, then Production. Publish Tool puts it in Beta for the testers; Request Production asks an Admin to release it; Deploy Beta/Prod is where the Admin tests and approves it. Every release can be undone.

A tool goes from the DEV tab to Beta to Production. Publish Tool, Request Production and Deploy Beta/Prod move it along, and every release can be undone.

Publish Tool

Publishers and Admins

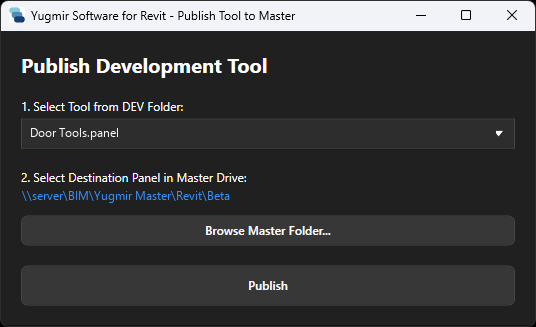
Sends a tool you have tested on your DEV tab to your firm's Beta testers.

  1. Click Publish Tool.
  2. Choose the tool (its panel or tab) from your DEV folder.
  3. Check the destination. Publishers publish into Beta; an Admin may choose any folder.
  4. Press Publish. Beta testers get the tool on their next Sync.
  5. Your DEV copy stays until the tool is approved, so a rejected tool is still there to fix.

Good to know: Yugmir warns before you replace a tool someone else published. Publishing straight to Production is for urgent fixes only – it skips testing.

The Publish Tool window in Yugmir Software for Revit

Request Production

Publishers and Admins

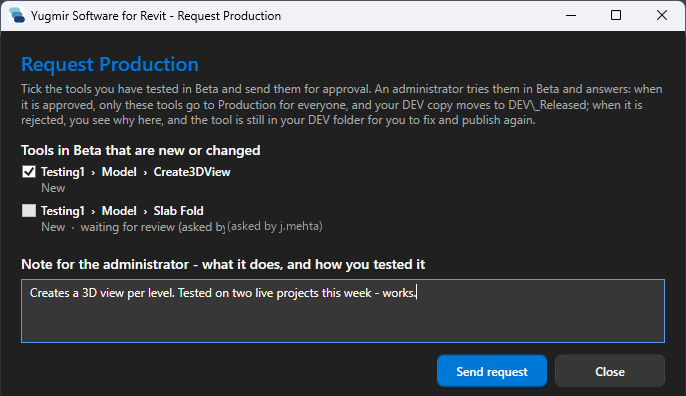
Asks an Admin to release the tools you tested in Beta to everyone – and shows you the answer.

  1. Click Request Production.
  2. Tick the tools to release. Only tools in Beta that are new or changed are listed.
  3. Write a short note: what the tool does and how you tested it.
  4. Press Send request. The Admin's ribbon shows that a request is waiting.
  5. The answer appears under My requests: Approved, or Rejected with the reason.

Good to know: Changed your mind? Withdraw takes back a request nobody has answered yet.

The Request Production window in Yugmir Software for Revit

Deploy Beta/Prod

Admins only

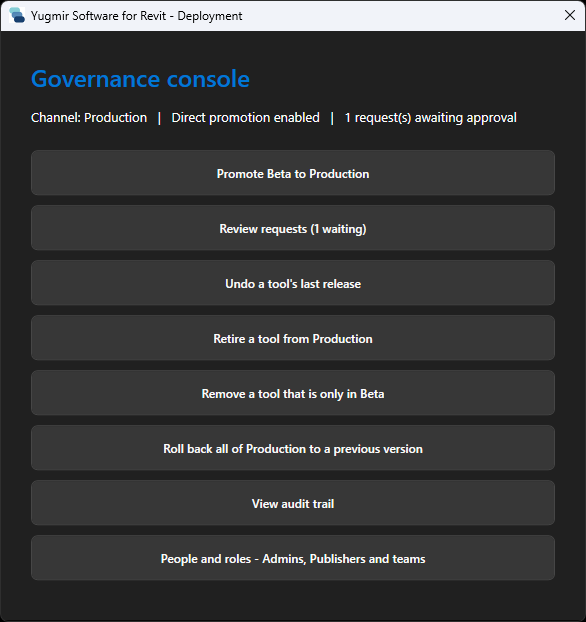
The Admin's control room for releases: approve requests, release Beta, undo, retire and decide who can do what.

  1. Review requests – test the requested tools and approve or reject them, one request at a time.
  2. Promote Beta to Production – a planned release of everything new in Beta at once.
  3. Undo a tool's last release, or Roll back all of Production to an earlier version.
  4. Retire a tool from Production, or Remove a tool that is only in Beta.
  5. View audit trail – every release, approval and rollback, with who and when.
  6. People and roles – Admins, Publishers, Beta testers and teams.

Good to know: Production is saved before every change, so any release can be undone. A firm can require a second Admin to approve each promotion.

The Deploy Beta/Prod window in Yugmir Software for Revit

Deploy – Review requests

Admins only

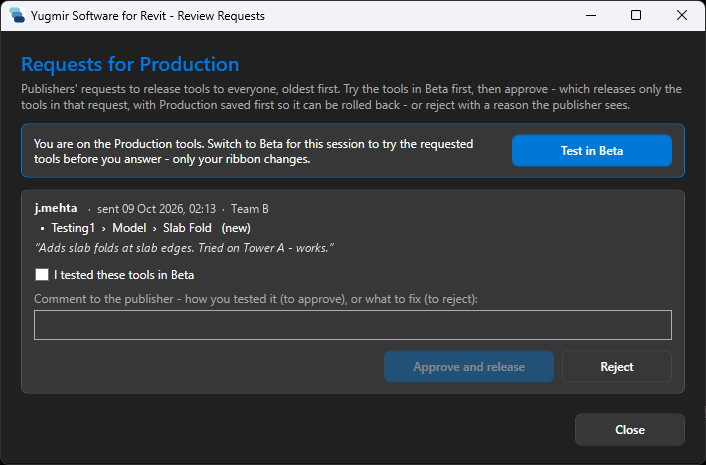
Day-to-day releasing: each Publisher's request is tested and answered on its own.

  1. In Deploy Beta/Prod, choose Review requests. Each request shows who sent it, its tools and their note.
  2. Press Test in Beta. Only your ribbon switches to the Beta tools, for this session.
  3. Try the tools, then open Review requests again.
  4. Tick I tested these tools in Beta and write how you tested them.
  5. Approve and release moves only that request's tools to Production. Reject needs a reason.

Good to know: Nobody can approve their own request. The Publisher sees your note with the answer.

The Deploy Beta/Prod window in Yugmir Software for Revit

Deploy – People and roles

Admins only

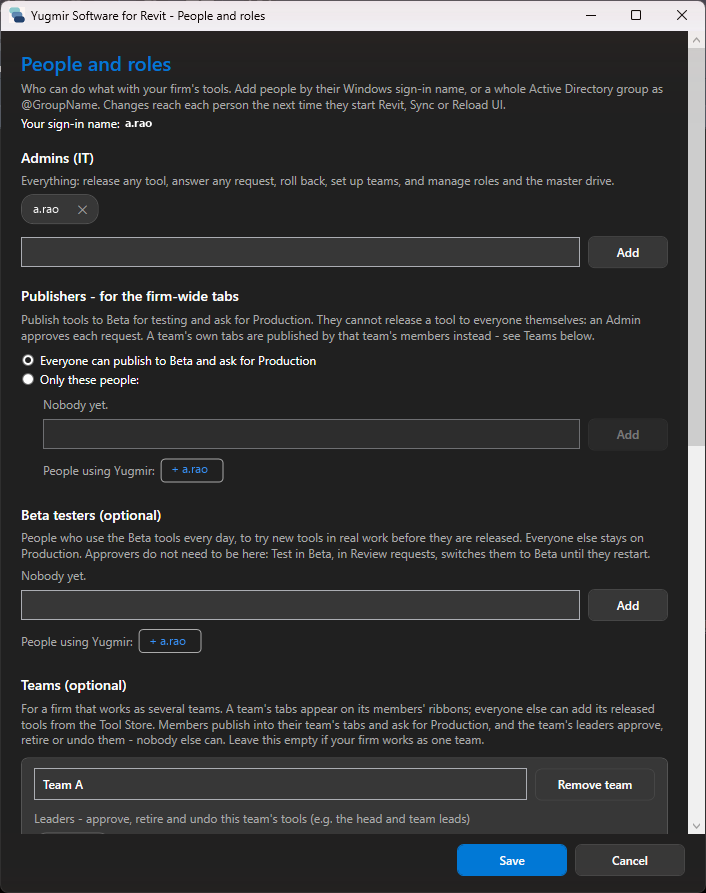
Decide who can release tools, who tests them, and – in larger firms – which team owns which tabs.

  1. In Deploy Beta/Prod, choose People and roles.
  2. Admins: name the people who release tools and manage the library.
  3. Publishers: let everyone publish to Beta, or only the people you name.
  4. Beta testers: the people who use Beta tools in their daily work.
  5. Teams (optional): leaders, members and the tabs each team owns. Press Save.

Good to know: Add people by Windows sign-in name or a whole Active Directory group (@GroupName). Changes reach each person the next time they start Revit, Sync or Reload UI.

The Deploy Beta/Prod window in Yugmir Software for Revit

Publish Wiki

Admins only

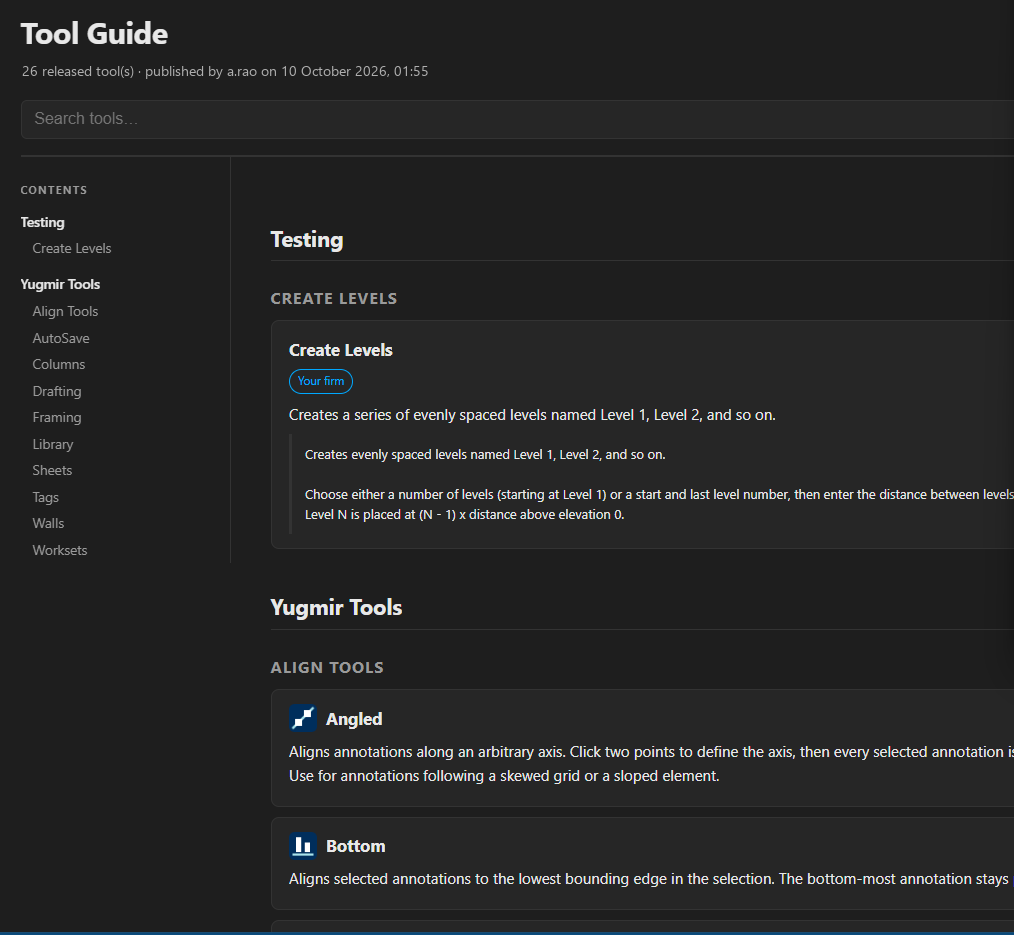
Publishes your firm's tool guide – a searchable page describing every released tool – for everyone.

  1. Click Publish Wiki.
  2. Yugmir builds the guide from every released tool, grouped by tab and panel.
  3. It is published to your shared library; a summary says how many tools it covers.
  4. Every user's Tool Guide (in Help & Resources) now opens this page.

Good to know: Tools without a description are listed, so gaps in your documentation are easy to spot. Publish again after each release.

Your firm's tool guide, as Publish Wiki publishes it

Check Master Drive

Admins only

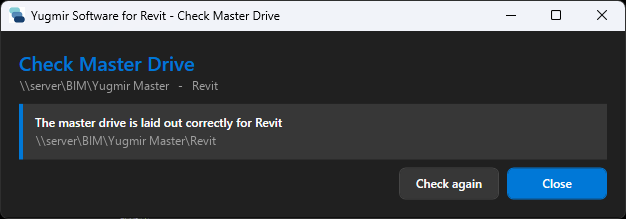
Checks your shared tool library for anything that would upset syncing, publishing or releasing – and fixes it in one click.

  1. Click Check Master Drive.
  2. Yugmir checks the library's layout, roles and channels.
  3. Each problem is listed in plain words, with a Fix button where a safe fix exists.
  4. Press Check again to confirm. A healthy library says it is laid out correctly.

Good to know: Setting up a new library? Yugmir offers to create it for you and lists exactly what it will add. Nothing already there is changed.

The Check Master Drive window in Yugmir Software for Revit

Admin Analytics

Admins only

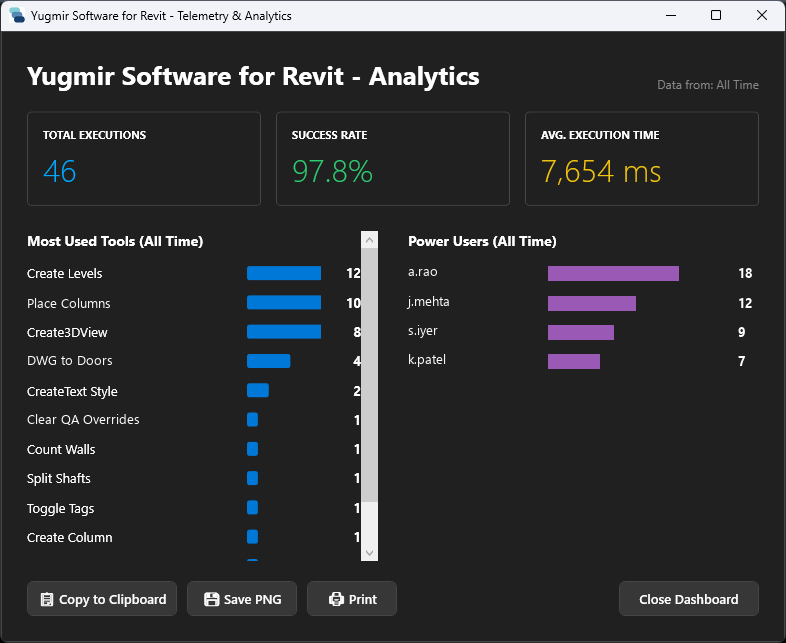
One dashboard of how your firm uses its tools: runs, success rate, time per run, most used tools and top users.

  1. Click Admin Analytics.
  2. Read the totals: tool runs, success rate and average run time.
  3. See which tools are used most, and by whom.
  4. Copy to Clipboard, Save PNG or Print to share it.

Good to know: Counts only people who agreed to usage data. Nothing about your models is ever recorded.

The Admin Analytics window in Yugmir Software for Revit
Names and figures shown are sample data.

Fleet Report

Admins only

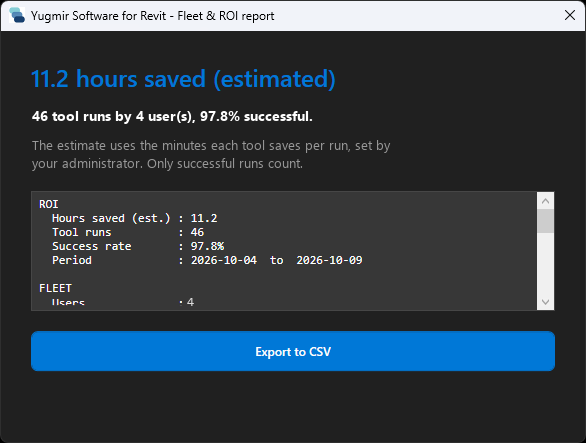
Hours saved, failing tools and out-of-date installs across the firm – ready for IT and management.

  1. Click Fleet Report.
  2. The headline is the estimated hours saved, from the minutes each tool saves per run.
  3. Below: tool runs, users, success rate, installed versions and tools that fail often.
  4. Press Export to CSV to take it into Excel or hand it to IT.

Good to know: Only successful runs count towards hours saved. Your administrator sets the minutes saved per tool.

The Fleet Report window in Yugmir Software for Revit
Names and figures shown are sample data.

Help & Resources One menu on every user's ribbon

What’s in the menu

Everyone

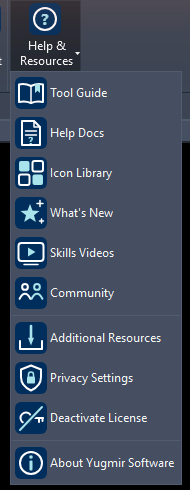
Everything for learning, support and your licence, in one menu.

  1. Tool Guide – your firm's searchable guide to every tool. Help Docs – the full manual, offline.
  2. Icon Library – artwork for the tools you build. What's New – the latest release notes.
  3. Skills Videos, Community and Additional Resources – training and other users.
  4. Privacy Settings – see what usage data is recorded, and switch it off.
  5. Deactivate License – free your licence to move it to another computer.
  6. About – version and licence status, the first thing to quote to support.

Good to know: One licence covers Yugmir Software for Revit and for AutoCAD – deactivating frees both.

The Help & Resources menu

Try it on your own models

Yugmir Software for Revit, free for 15 days. Full product, no card required.